


Explore News

Purchase Guide
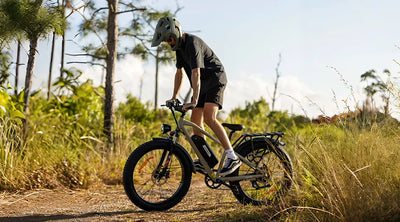
Kingbull Ranger Pre-Order: The Ultimate Retro Electric Bike for Long-Range Off-Road Adventures
Built for the Wild, Styled for the Streets: The Kingbull Ranger Era Begins
Some rides are just about getting from A to B. But the Kingbull Ranger is designed for those who want to break free and explore the unknown. As the newest flagship in our lineup, the Ranger is a high-performance moped-style ebike that perfectly blends vintage soul with modern power. Whether you are navigating rugged forest trails or cruising through city boulevards, this bike is built to redefine your riding experience.
1. Vintage Soul Meets Modern Performance
If you are looking for a retro electric bike that makes a statement, the Ranger is it. Inspired by classic motorcycle aesthetics, its design features a bold high-carbon steel frame and a premium brown leather saddle. But don't let the "vintage" look fool you—underneath its classic exterior lies a cutting-edge electric moped bike motor capable of a 1300W peak output, ensuring you have the torque needed for steep hills and rapid acceleration.
2. Go Further with a Long-Range Electric Bike
Range anxiety is a thing of the past. The Kingbull Ranger is a true long-range electric bike, equipped with a massive 48V 18Ah (864Wh) lithium battery.
Explore More: Achieve up to 80 miles on a single charge.
Efficiency: Tuned for endurance, making it the ideal companion for weekend escapes and long-distance commutes without frequent recharging.
3. All-Terrain Mastery: Full Suspension & Fat Tires
The Ranger isn't just a moped-style ebike for show; it’s a beast off-road.
Full Suspension Confidence: The dual-crown front fork and rear hydraulic shocks work in harmony to soak up bumps, providing a smooth, stable ride on gravel, dirt, or cracked pavement.
20" x 4.0" Fat Tires: These puncture-resistant CST fat tires provide an oversized contact patch for maximum grip, giving you the freedom to ride through sand, snow, or mud with total control.
4. Safety & Precision Control
Safety is at the heart of the Ranger's design. Featuring responsive hydraulic brakes with power cut-off sensors, you can stop on a dime even at its top speed of 28 MPH. The integrated LED lighting system, including turn signals and a bright 48V headlight, ensures you remain visible as a safe electric moped bike rider during night adventures.
Why Pre-Order the Kingbull Ranger Now?
The wait is almost over. By joining the pre-order phase, you secure more than just a bike—you secure an exclusive deal on the most versatile retro electric bike of 2026.
Exclusive Pre-Order Benefits:
Early Bird Pricing: Save big during our launch window (Feb 25 – Mar 4).
Priority Shipping: Be the first in your city to hit the trails.
Free Shipping & 2-Year Warranty: Peace of mind with every mile.
Limited First Batch: Once they’re gone, the next restock will take months.
Ready to Redefine Your Ride?
Don't settle for ordinary. Experience the perfect fusion of a moped-style e-bike and a long-range electric bike. Whether you’re a vintage lover or an off-road enthusiast, the Kingbull Ranger is the upgrade you’ve been waiting for.
👉 Pre-Order Your Kingbull Ranger Today – Limited Stock Available!
Read more

Ebike Comparison
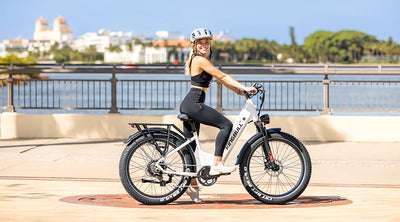
Which is the best folding electric bike of 2026? Kingbull Verve vs. Aventon Sinch 2.5
In today’s rapidly evolving electric mobility landscape, the foldable electric bike has become the top choice for countless urban commuters and outdoor enthusiasts, thanks to its blend of portability and multi-terrain versatility. Among the sea of brands, the Kingbull Verve and the Aventon Sinch 2.5 have emerged as two of the most talked-about models on the market.
While both are positioned as high-performance folding e-bikes, a deep dive into their core specifications reveals that the Kingbull Verve delivers surprising "value for money," offering massive performance reserves while maintaining a highly competitive price point.
Core Powertrain: A Battle of Explosive Power and Efficiency
1. The Heart of the Ride: Motor and Torque
Kingbull Verve: Features the industry-renowned BAFANG 750W motor, reaching a massive 1400W peak power with 90 Nm of torque. This configuration ensures absolute dominance when accelerating from a stop or tackling steep hill climbs.
Aventon Sinch 2.5: Utilizes a 500W motor (1056W peak) with 60 Nm of torque. While sufficient for daily urban pavement, it lacks the raw power reserves needed for an all-terrain e-bike when facing soft sand or muddy inclines.
2. Battery Life and Energy: Powered by Samsung Cells
Kingbull Verve: Truly built for the long-range e-bike enthusiast, it is equipped with a SAMSUNG 960Wh (20Ah) battery, offering a maximum range of up to 80 miles. This high-capacity, premium cell setup not only extends your journey but also ensures a longer overall battery lifespan.
Aventon Sinch 2.5: Comes with a 636.4Wh (14Ah) battery, providing roughly 55 miles of range. For long-distance weekend trips or high-frequency commuting, the Kingbull’s ~45% extra capacity means you’ll charge half as often, with the added reliability of Samsung’s discharge cycle standards.
Control and Comfort: Refined Riding Feedback
3. Intelligent Handling: Torque Sensor vs. Assist Levels
The Common Ground: Both bikes are equipped with high-end torque sensors that adjust power output in real-time based on your pedaling force, providing a natural and intuitive "acoustic bike" feel.
The Difference in Tuning: The Kingbull Verve offers 5 levels of pedal assist, providing a more granular and refined tuning than Aventon’s 4 levels. This allows you to precisely match the motor’s support to your fitness level and varying road conditions.
4. Suspension and Environmental Adaptability
Kingbull Verve: Equipped with a ZOOM 80mm travel lockout suspension fork. The longer travel effectively filters out vibrations on gravel and uneven city streets.
Aventon Sinch 2.5: Uses a 50mm travel fork. While it includes a suspension seatpost, the 80mm fork on the Verve provides a clear advantage in initial shock absorption when navigating complex all-terrain paths.
Safety and Protection: Leading Hardware Specs
5. Braking Safety: The Piston Advantage
Kingbull Verve: Upgraded with Tektro 4-piston hydraulic disc brakes. Compared to standard 2-piston setups, the 4-piston design offers a larger friction area and more uniform braking force—a critical life-safety feature during high-speed descents or when carrying heavy loads.
Aventon Sinch 2.5: Uses 2-piston hydraulic brakes. While superior to mechanical brakes, they reach their performance limit sooner than the Verve's 4-piston system.
6. Waterproof Rating
Kingbull Verve: Boasts an IPX6 waterproof rating, meaning it can resist high-pressure water streams. This provides peace of mind when commuting in heavy rain or when deep-cleaning the bike.
Aventon Sinch 2.5: Rated at IPX5.
Utility and Payload: A Boon for Heavy-Duty Riders
7. Payload Capacity
Kingbull Verve: Features a total payload capacity of 450 lbs, with a reinforced aluminum rear rack rated for 150 lbs. This transforms it from a simple folding bike into a capable cargo e-bike contender.
Aventon Sinch 2.5: Max payload is 300 lbs. For larger riders or those needing to transport significant gear, the Kingbull provides a much sturdier structural foundation.
8. Display and Interaction
Kingbull Verve: Features a 4.0-inch full-color multi-function display. Compared to Aventon’s side-mounted screen, it offers a more premium visual experience with richer, easier-to-read data at a glance.
Value Comparison: Why Kingbull Verve is the Smarter Investment
Foldable Electric Bike
Kingbull Verve Ebike
Aventon Sinch 2.5 Ebike
Price Value
$1,399.0
$1,799.00
Motor Quality
BAFANG 750W (Peak 1400W)
500W (1056W Peak)
Battery Capacity
SAMSUNG 960Wh (20Ah)
636.4Wh (14Ah)
Max Range
Up to 80 Miles
Up to 55 Miles
Fork
ZOOM 80mm travel
Aventon coil fork
Brakes
Tektro 4-piston hydraulic disc brakes
Tektro Hydraulic disc brake
Sensors
TROG-1B torque sensor
Torque Sensor
Rear Derailleur
SHIMANO 8-speed
SHIMANO 8-speed
Pedal Assist
5 Levels
4 Levels
Water Resistant
IPX6
IPX5
Display
4.0" full color multi-function display
Side display with intuitive controls with USB-C
Max Payload Capacity
450 lbs
300 lbs
Rider Height
5'2" - 6'6"
4'11" - 6'2"
Summary: The Best Budget High-Performance E-Bike
The Aventon Sinch 2.5 remains a solid, well-branded option with a strong design aesthetic. However, the Kingbull Verve manages to outperform it across nearly every core metric—motor power, battery capacity, braking specs, and payload—all while being $400 more affordable ($1,399 vs $1,799).
If you are looking for a foldable electric bike that can seamlessly commute through urban jungles one day and conquer all-terrain wilderness the next, the Kingbull Verve is undoubtedly the smartest choice on the market for 2026.
Read more

Kingbull News
Kingbull’s UL Certification Status: A Transparent Update
At Kingbull, safety has always been at the core of every e-bike we design—whether it’s a commuter built for daily city rides, a rugged model for off-road trails, or a versatile bike for weekend adventures.
As e-bike safety standards continue to gain attention across the U.S. and beyond, we know riders, retail partners, and future customers want clear, reliable information about UL certification—what it means, and how it applies to each model in our lineup.
Today, we’re sharing a transparent overview of Kingbull’s UL certification status, explaining the key standards behind it, and outlining why safety is non-negotiable for us.
Where Kingbull’s Lineup Stands on UL Certification
At Kingbull, we take a model-level approach to UL certification. Each e-bike is evaluated individually so riders can clearly understand the safety standards that apply to their specific model.
Kingbull 2.0 Models (Literider 2.0, Discover (ST) 2.0, Rover 2.0, Voyager 2.0)
All Kingbull 2.0 models listed above have completed UL safety testing.These models have achieved UL 2849 certification, verifying that the complete integrated electrical system—including the motor, controller, wiring, and charger—meets recognized industry safety standards for daily, real-world use.
Most models have also obtained UL 2271 certification for lithium-ion battery safety. Together, these certifications represent Kingbull’s internal safety benchmark, ensuring reliable performance across riding, charging, and storage scenarios.
Forge Series — UL 2849 Certification Achieved
We are proud to announce that the Forge Series (including the EX Titan, Jumper Go, Verve, and Trekker) has officially been granted the UL 2849 certification. This milestone confirms that our electric bikes meet the industry's premier safety standards for electrical systems and drivetrain combinations.
The official certification is now fully active. For complete transparency, we invite our riders and partners to verify Kingbull’s compliance status directly on the UL Product iQ® directory using the link below:
👉 View Kingbull’s Official UL 2849 Listing
Looking Ahead: Expanding Our UL Safety Roadmap
As part of our unwavering commitment to quality, we are excited to announce that the Hunter 2.0, Hunter 2.0s, and the all-new Ranger have been officially integrated into Kingbull’s UL certification program.
Our engineering team is currently moving through the evaluation and testing phases to ensure these high-performance models meet the same rigorous safety standards as our Forge Series. For us, UL certification is more than just a label—it is a core promise of rider safety and long-term reliability. We will provide further updates as these models progress toward final certification.
What UL Certification Means for E-Bike Safety
UL (Underwriters Laboratories) certification is designed to evaluate safety risks associated with electrical products. In the e-bike industry, two standards are particularly important:
UL 2849: System-Level Electrical Safety
UL 2849 evaluates the entire electrical system of an e-bike, including the battery, motor, controller, wiring, and charger. Testing simulates real-world conditions such as electrical overloads, short circuits, and thermal stress.
Unlike component-only testing, UL 2849 assesses how all electrical parts function together as a complete system, helping identify risks that individual testing may miss.
UL 2271: Lithium-Ion Battery Safety
UL 2271 focuses specifically on lithium-ion battery packs. It evaluates battery cell safety, enclosure design, and resistance to thermal runaway—one of the most critical battery-related safety concerns.
Because many riders store and charge their e-bikes indoors, battery safety remains a top priority.
Why Dual Certification Matters
Combining UL 2849 and UL 2271 provides a comprehensive approach to e-bike electrical safety, ensuring the battery and entire electrical system operate safely together.
UL Certification and the Changing U.S. Market
UL certification is not currently a federal requirement in the U.S., but market expectations are shifting quickly.
E-bikes have become a daily transportation solution for commuters, families, and outdoor riders. As adoption grows, attention on lithium-ion battery safety has increased. Many retailers now prioritize UL-certified models, property managers increasingly require UL-listed e-bikes for indoor storage, and cities are pushing for clearer safety standards.
Rather than waiting for regulations to change, Kingbull invests in UL certification to protect riders today and prepare for the future.
Safety Goes Beyond Certification
While UL certification is critical, safe ownership also depends on proper use. We recommend:
Always using the original Kingbull charger
Charging in a well-ventilated area
Following maintenance guidelines in your owner’s manual
Avoiding modifications to the electrical system
We also encourage riders to ask for clear, model-specific UL certification information when choosing an e-bike.
Looking Ahead
Kingbull designs e-bikes for commuting, recreation, and off-road riding across multiple international markets. UL certification is an important step—but not the final one.
As safety standards evolve, we’ll continue investing in testing, engineering, and transparent communication.
We’re riders too, and we build the bikes we want to ride—with safety always at the center.
Our approach emphasizes thoughtful engineering, real-world reliability, and alignment with recognized safety standards.
To learn more about our lineup or safety practices, visit our website or contact our team customers@kingbullbike.com—we’re always happy to help.
Read more

Purchase Guide
Valentine’s Day 2026 Gift Guide: Love in Every Mile with Kingbull Ebikes
Valentine’s Day is no longer just about wilting flowers and generic chocolates. In an era where experiences trump possessions, the ultimate romantic gesture is a gift that fuels adventure, health, and shared memories. This year, upgrade your surprise. Discover why a Kingbull electric bike is the best way to say "I love you" while exploring the great outdoors together.
Why a High-Performance E-Bike is the Ultimate Romantic Investment
At Kingbull, we believe the best gift is quality time. Transitioning from a traditional bicycle to a high-performance electric bike changes the dynamic of your relationship. If you are looking for the best electric bikes for adults, here is why Kingbull stands out:
Bridge the Fitness Gap: With our advanced pedal-assist system (PAS), partners with different stamina levels can finally ride side-by-side. No one gets left behind on the steep hills.
Eco-Friendly Romance: Swap the gas-guzzling car for a sustainable electric commuter bike. Enjoy a carbon-free date night while reducing your environmental footprint.
The Gift of Longevity: Unlike a bouquet, a Kingbull e-bike provides years of utility. Our Samsung lithium batteries ensure long-term reliability for thousands of miles of weekend escapes.
The Kingbull Valentine’s Gift Guide: Find Their Perfect Match
Choosing the best e-bike for your partner depends on their riding style. Here is our curated selection for the 2026 season:
1. For the Thrill-Seeker: Kingbull Hunter 2.0
The Kingbull Hunter 2.0 is a rugged fat tire electric bike built for off-road trails. Featuring a powerful 750W geared hub motor and CST 26"*4.0" puncture-resistant tires, it’s perfect for the partner who loves conquering mountains, snow, or sand dunes. It is the gold standard for all-terrain e-bikes.
2. For the Style Icon: Kingbull Discover ST 2.0
The Kingbull Discover ST 2.0 is a sleek step-thru electric bike that combines elegance with ergonomic comfort. It is the ideal city cruiser e-bike for urban commutes or effortless weekend brunch runs.
3. For the Traveler: Kingbull Literider 2.0
Meet our premier folding electric bike. The Literider 2.0 features a lightweight frame that fits easily in a car trunk or RV. It is the perfect companion for road trips and spontaneous getaways for couples who are always on the move.
4. For the Long-Distance Duo: Kingbull Voyager 2.0
A long-range e-bike with a massive payload capacity. The Voyager 2.0 is designed for those who want to carry picnic gear, heavy groceries, or even a furry friend. With its high-capacity battery, you can ride further without "range anxiety."
Three Romantic "E-bike Date" Ideas for 2026
Ready to put those brushless motors to the test? Here are three ways to ignite the spark this February 14th:
The Sunset Picnic: Utilize the Voyager 2.0’s sturdy integrated rear rack to carry a wine cooler and charcuterie board. Ride to the highest local viewpoint for a private toast.
City "Slow-mance": Hop on your Discover ST 2.0 and navigate hidden urban gems. Avoid the stress of Valentine's Day traffic and parking—simply lock up at the front door of your favorite bistro.
Digital Love Letters: Use a cycling app like Strava to track your route and "GPS-draw" a giant heart across the city. It’s a unique, healthy way to share your love on social media.
2026 Valentine’s Day Exclusive: The "Share the Love" Sale
Because the best rides are shared, we are launching our biggest Electric Bike Sale of the year.
Buy 2 save extra $150: Save $150 instantly when you purchase any two Kingbull E-bikes.
Free accessory gift package: We believe in value. During this promotion, EVERY Kingbull purchase includes a Premium High-Value Accessory Bundle.
Valentine's:Valentine's Dinner = $200 (Lasts 2 hours)Weekend Getaway = $800 (Lasts 2 days)Our E-bike = $899 (Lasts 5+ years, saves gas, fun every day)
Daily:Car Commute vs. E-Bike RideGas: $150/mo vs. $2/moParking: $200/mo vs. FREEGym: $50/mo vs. INCLUDED"Boy Math" says an E-bike is basically free after the first few months of gas savings.
Final Thoughts: Give the Gift of Freedom
Don't settle for the ordinary. Give your partner 60+ miles of range and a lifetime of adventure. Whether you are searching for an affordable fat tire e-bike or a comfortable step-through electric bicycle, Kingbull delivers unmatched quality and power.
[Shop the Kingbull Valentine's Day Collection Now] 👈
Read more

Ebike Comparison
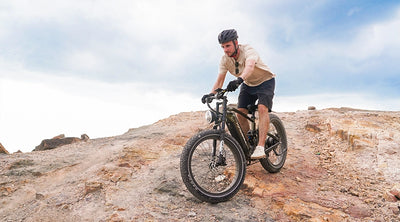
Ultimate Cargo Ebike Comparison: Kingbull Voyager 2.0 vs Lectric XPedition 2.0 – Which is the Best Value for You?
In the rapidly evolving 2026 market for all-in-one cargo electric bikes, two names consistently dominate the conversation: the Kingbull Voyager 2.0 and the Lectric XPedition 2.0. Both models offer heavy-duty performance and advanced sensor technology, but which one truly earns the title of the best value cargo ebike?
In this deep dive, we break down every technical specification to help you decide which ride fits your lifestyle.
1. Price Point & Bonus Value
Kingbull Voyager 2.0: Single Battery: $1,299 | Dual Battery: $1,499
Lectric XPedition 2.0: Single Battery: $1,399 | Dual Battery: $1,799
Deep Dive: Both brands offer exceptional value, but Kingbull leads in affordability. While maintaining a competitive price, Kingbull includes a $347 accessory bundle plus a cargo trailer for free. For users seeking an affordable cargo ebike with massive utility, Kingbull provides a truly complete "out-of-the-box" experience.
2. Aesthetics & High-Visibility Color Options
Kingbull Voyager 2.0: Available in signature Orange and Grey.
Lectric XPedition 2.0: Available in minimalist White and Blue.
Deep Dive: Design is about more than just looks; it's about safety. Kingbull’s vibrant Orange increases visibility for urban commuters, while the Grey offers a sophisticated, understated vibe for city riding.
3. Motor Power & Reliability
Kingbull Voyager 2.0: Features a Customized Bafang 750W Motor with 80Nm torque.
Lectric XPedition 2.0: Equipped with a 750W Motor delivering 80Nm torque.
Deep Dive: While power output is equal, Kingbull’s partnership with Bafang—a global leader in e-drive systems—ensures a reliable supply chain and proven durability for carrying heavy loads up steep inclines.
4. Battery Quality: The Samsung Advantage
Kingbull Voyager 2.0: Powered by a SAMSUNG 15Ah (720Wh) battery pack.
Lectric XPedition 2.0: Features a 13Ah (624Wh) battery pack.
Deep Dive: Kingbull offers roughly 15% more capacity per battery. Furthermore, by explicitly using Samsung ebike battery cells, Kingbull guarantees higher stability, better safety, and a longer overall lifespan for your investment.
Cargo Model
Kingbull Voyager 2.0
Lectric XPedition 2.0
Price Value
$1299 (Single Battery)$1499 (Dual Battery)
$1399 (Single Battery)$1799 (Dual Battery)
Color
Orange/ Grey
White/ Blue
Motor Quality
Customized Bafang 750W (80Nm)
750W (80Nm)
Battery Capacity
SAMSUNG 15Ah (720Wh)
13Ah (624Wh)
Max Range
60 Miles (Single Battery)100 Miles (Dual Battery)
60 Miles (Single Battery)120 Miles (Dual Battery)
Battery Location
Integrated
Behind-the-Seat
Professional certification
UL 2849(E-Bike)UL 2271(Battery)
UL 2849(E-Bike)UL 2271(Battery)
Fork
60mm travel
50mm travel
Brakes
ZOOM 2 pistons hydraulic disc brakes
Hydraulic disc brakes
Max Payload Capacity
450 lbs
450 lbs
Sensors
TROG-1B torque sensor
Torque Sensor
Rear Derailleur
SHIMANO 7-speed
SHIMANO 8-speed
Rear Rack
Integrated rear rack
Long rear rack
Tires
CST 20" x 4.0"
20" x 2.5"
Free Gift
Accessory pack & trailer (value $347)
Accessory pack (value $346)
5. Real-World Range Capabilities
Kingbull Voyager 2.0: Single: 60 miles | Dual: 100 miles.
Lectric XPedition 2.0: Single: 60 miles | Dual: 120 miles.
Deep Dive: While Lectric excels in peak dual-battery range, Kingbull’s 100-mile configuration is the "sweet spot" for long-distance riding, perfectly balancing the bike's total weight with daily utility needs.
6. Integrated Battery Design
Kingbull Voyager 2.0: Integrated (In-tube) battery design.
Lectric XPedition 2.0: Behind-the-Seat battery layout.
Deep Dive: Kingbull’s integrated design creates a lower center of gravity and a cleaner silhouette. By tucking the battery into the frame, it offers superior protection against dust and moisture, enhancing performance in all weather conditions.
7. Industry-Standard Safety Certifications
The Safety Shield: Both models are rigorously tested and UL 2849 Certified (E-bike System) and UL 2271 Certified (Battery).
Deep Dive: These certifications are the "Gold Standard" of the e-bike industry. Regardless of your choice, you are guaranteed the highest level of fire safety and electrical protection for your home.
8. Superior Suspension & Ride Comfort
Kingbull Voyager 2.0: 60mm Travel Suspension Fork.
Lectric XPedition 2.0: 50mm Travel Suspension Fork.
Expert Analysis: When carrying heavy loads or a baby seat, every millimeter of suspension counts. Kingbull Voyager 2.0’s 60mm fork absorbs more road chatter, providing a smoother, more stable experience for your cargo and your passengers.
9. Precision Hydraulic Braking
Kingbull Voyager 2.0: ZOOM Dual-Piston Hydraulic Disc Brakes.
Lectric XPedition 2.0: Hydraulic Disc Brakes.
Expert Analysis: Hydraulic brakes are a must for cargo bikes. Kingbull uses the reputable ZOOM system, known for its progressive "bite" and reliable stopping power even when the bike is at its 450 lbs limit.
10. Frame Integrity & Payload Capacity
Max Payload: Both support a massive 450 lbs total load.
Craftsmanship: Kingbull features an Integrated Welded Rear Rack.
Deep Dive: Kingbull’s integrated welding increases the overall rigidity of the frame. This "one-piece" approach prevents the rattling often found in bolt-on racks and ensures long-term durability for heavy-duty use.
11. Intuitive Torque Sensor Technology
Kingbull Voyager 2.0: Proprietary TROG-1B Torque Sensor.
Lectric XPedition 2.0: Standard Torque Sensor.
Deep Dive: The torque sensor is the soul of a high-end ebike. Kingbull’s tuning is focused on sensitivity, perfectly translating your pedaling effort into a natural ride feel that feels powerful yet incredibly smooth.
12. Optimized Drivetrain
Kingbull Voyager 2.0: Shimano 7-Speed System.
Lectric XPedition 2.0: Shimano 8-Speed System.
Deep Dive: While Lectric offers an extra gear, the Shimano 7-speed system on the Kingbull is celebrated for its simplicity and durability. With 80Nm of motor torque, seven gears are more than enough to conquer steep hills.
13. All-Terrain Tire Versatility
Kingbull Voyager 2.0: CST 20" x 4.0" All-Terrain Fat Tires.
Lectric XPedition 2.0: 20" x 2.5" City Tires.
Deep Dive: This is the defining difference. Kingbull’s 4.0-inch Fat Tires provide unparalleled grip and natural shock absorption, making it a true all-terrain utility ebike capable of handling sand, gravel, and wet pavement with ease.
Final Verdict: Which Cargo Ebike Wins?
The Lectric XPedition 2.0 remains a formidable competitor with its long-standing brand reputation and 8-speed gearing.
However, if you prioritize branded components (Samsung, Bafang), all-terrain comfort (4.0" Fat Tires), and the best value-for-money (including a free trailer), the Kingbull Voyager 2.0 is the clear standout. It is the ultimate affordable, high-quality cargo ebike designed for riders who refuse to compromise on specs.
🔥 Upgrade your lifestyle today! Visit the official Kingbull website to learn more about the Voyager 2.0 and unlock the best deals for your next adventure.
Read more

Kingbull News
Free Spirit, Meet Your Match: Green Literider 2.0 for ENFPs
Are you an ENFP? You know the type—curious, adventurous, and always chasing the next exciting experience. You live for freedom and spontaneity, choosing unplanned detours over rigid routines every time. One day you’re zipping to work on a familiar commute; the next, you’re coasting along the beach or veering down a new trail, just because the mood strikes.
That’s exactly why the Kingbull Literider 2.0 feels like it was designed for you.
Designed for Flexibility (Just Like ENFPs)
ENFPs hate being boxed in—and neither does this bike. The Literider 2.0 is a 20-inch fat-tire folding e-bike, built to keep up with your go-with-the-flow energy. Fold it up, toss it in your car trunk for a last-minute road trip, stash it in your apartment’s tiny corner, or take it anywhere your curiosity leads.
Weighing in at 71 lbs, it hits the sweet spot between a solid, durable build and everyday practicality. Sturdy enough to handle rough paths, yet light enough to maneuver on busy city streets—no overthinking, no hassle, just pure rideability.
Power to Follow Your Curiosity (No Limits Attached)
ENFPs don’t do “sticking to the map”—and this bike’s got the muscle to keep up with your “why not?” attitude. Packing a 750W rear hub motor (with a 1300W peak output) and a 720Wh battery, it cranks out up to 55 miles of range per charge. No more stressing over battery levels mid-adventure—whether you’re climbing rolling hills, cruising city boulevards, or tearing through sand and gravel, this bike’s got your back.
Class 2 or Class 3 — You Call the Shots
One-size-fits-all? Not for ENFPs, and not for the Literider 2.0. It ships as a Class 2 e-bike by default, but you can easily tweak it up to Class 3, unlocking pedal-assist speeds of up to 28 mph. Feel like a slow, relaxed cruise today? Keep it Class 2. Craving a faster, more energetic ride tomorrow? Switch it up. Same bike, totally different vibe—just how you like it.
Comfort & Confidence for Every Unplanned Ride
ENFPs care about how things feel—and this bike feels good. The Literider 2.0 is built to keep you comfortable and confident, no matter where the road takes you:
20-inch fat tires that glide over every terrain—city pavements, snowy lanes, sandy shores, and gravel trails included
2-piston hydraulic disc brakes that deliver strong, reliable stopping power, even on downhill runs
Front suspension fork with adjustable damping and lockout, smoothing out bumps and ruts for a silky-smooth ride
All-aluminum frame with a removable integrated battery, boasting a clean, modern look that turns heads without trying too hard
It’s the kind of bike that feels fun, forgiving, and totally in sync with your vibe—perfect for riders who want enjoyment without the stress.
Why Green Is Perfect for ENFPs
Green isn’t just a color here—it’s a vibe. It’s energy, growth, and constant movement—the very traits that make ENFPs who they are. Riding the green Literider 2.0 isn’t just about getting from A to B; it’s about showing the world who you are. It stands out, but in a laid-back, effortless way—just like you.
Final Thoughts
If you’re an ENFP on the hunt for an e-bike that’s as versatile, powerful, and adventurous as you are, the Kingbull Literider 2.0 ticks every box. Fold it, ride it, take it somewhere new—or rediscover a familiar spot in a whole new way.
Because let’s be real—the best rides are never the ones you plan.
Read more