


Explore News

Maintenance
How to Install a Rear Basket on Your Ebike
Upgrade your cycling experience with the Kingbull Large Rear Basket—your go-to solution for adding practical, spacious storage to your bike, no matter what your ride entails. Designed to boost convenience and functionality, this rear basket is a game-changer for daily commuters, casual riders, and errand-runners alike. Whether you’re heading out for a morning ride and need to stow energy-boosting snacks (like granola bars, fruit, or a water bottle) to refuel on the go, picking up groceries after work without juggling a heavy bag, toting your laptop or work essentials to the office, or even carrying small items for a weekend picnic or hike, this roomy basket has you covered. It’s built to hold your belongings securely, so you can ride with peace of mind, knowing your essentials won’t shift or fall off mid-ride—eliminating the hassle of backpacks, tote bags, or awkwardly balanced items while you cycle.
Installing the Kingbull Large Rear Basket is quick and straightforward, even if you’re not particularly handy with tools.
Below, I’ll walk you through each step in detail, with clear, easy-to-follow instructions to ensure you mount the basket securely to your bike rack.
Step 1: Position the Basket
Place the rear basket onto the bike rack in the correct orientation. Align the mounting holes with the rack as shown in the image—this ensures the basket sits level and secure, with no wobble once installed. Double-check the alignment to avoid having to readjust later; the basket should sit centered on the rack for balanced weight distribution.
Step 2: Secure the Screws
We recommend tightening one screw first to hold the basket firmly in place on the rack. This temporary anchor will keep the basket from shifting as you align the remaining three holes, making the rest of the installation process much easier. Take your time to ensure the first screw is snug (but not over-tightened) so you can still adjust the basket’s position slightly if needed.
Step 3: Tighten All Screws
Once all holes are properly aligned, gradually tighten the remaining three screws—work evenly, tightening each one a little at a time, rather than fully tightening one screw before moving to the next. This ensures the basket is secured uniformly, maintaining proper balance and stability. Over-tightening can damage the basket or rack, so aim for a snug fit that keeps the basket from moving.
Final Check
After installation, give the basket a gentle shake and lightly pull on it to confirm it is firmly attached to the rack—there should be no wobble or movement. If the basket feels loose, double-check the screws and tighten any that need adjustment.
Now you’re ready to hit the road with your new Kingbull Large Rear Basket, enjoying the extra storage and convenience for all your daily rides, errands, and adventures!
Read more

Maintenance
Kingbull Hunter 2.0 Troubleshooting Guide: Expert Fixes for Error Codes E06-E11
The Kingbull Hunter 2.0 is built for rugged trails and long-range adventures. But like any high-performance machine, its onboard diagnostic system may occasionally display an error code. Understanding these codes is the key to maintaining your e-bike’s longevity and ensuring a safe ride.
In this guide, we’ll decode the Hunter 2.0 display symbols and provide actionable steps to fix common electrical issues.
Kingbull Hunter 2.0 Error Code Chart
Code
Meaning
Quick Diagnosis
E00
Normal
System is functional.
E06
Battery Under Voltage
Low battery or power delivery issue.
E07
Motor Fault
Communication or hardware issue in the motor.
E08
Throttle Fault
Issues with the accelerator or wiring.
E09
Controller Fault
Internal error in the "brain" of the e-bike.
E10/11
Communication Fault
Signal loss between the display and controller.
Deep Dive: How to Fix Every Error Code
E06: Battery Under Voltage
This code appears when the voltage drops below the safe operating limit.
The Fix: Charge your battery fully using the official Kingbull charger. If the error persists on a full charge, inspect the battery mounting plate for loose pins or debris.
E07: Motor Fault
Your Hunter 2.0’s motor relies on a secure connection to deliver its signature torque.
Step 1: Check the motor-to-controller waterproof connector. Look for burnt pins, bent needles, or moisture.
Step 2: Ensure the cable is pushed past the "arrow" alignment line for a solid connection.
E08: Throttle Fault (Accelerator Issue)
If your twist throttle isn't responding, check the following:
Main Line Inspection: Look for tears in the wiring harness. If the main line is damaged, it needs replacement.
Component Swap: Connect a new throttle to test. If it works, the old throttle was faulty.
Controller Check: Ensure the connection between the main line and the controller is tight and free of dust.
E09: Controller Fault
The controller manages the power flow between the battery and the motor.
Pro Tip: Disconnect the motor-to-controller interface.
If the code changes to E07, your controller might be okay, but the display or motor feedback is failing.
If the code stays E09, the controller has an internal hardware failure and requires a replacement.
E10 & E11: Communication Errors
These codes mean the display (receiving) and the controller (transmitting) aren't talking to each other.
Wiring Check: Disconnect and reconnect the display-to-main line and main line-to-controller plugs.
Hardware Sequence: If all wires are intact, the solution usually involves replacing the Controller first, followed by the Display if the issue persists.
Maintenance Tips for Hunter 2.0 Riders
Avoid High-Pressure Washes: While the Hunter 2.0 is water-resistant, high-pressure water can penetrate the connectors mentioned above, leading to E10/E11 errors.
Check Connectors Regularly: Vibrations from off-roading can loosen plugs. A quick "tug test" every few rides can prevent mid-ride errors.
Keep it Clean: Use a damp cloth to wipe down the display and throttle areas to prevent grit from entering the internal sensors.
Need More Help?
Still seeing an error on your Kingbull Hunter 2.0? Our technical support team is dedicated to keeping you on the road. Visit our official site for replacement parts or to contact a specialist.
Ride far. Ride free. Ride Kingbull.
Read more

Maintenance
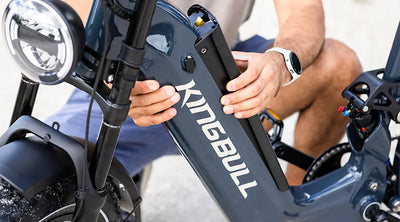
How to Install an External Battery on Your Kingbull Voyager 2.0: The Ultimate Dual-Battery Guide
If you love your Kingbull Voyager 2.0 cargo ebike but wish you could go farther on a single charge, you are not alone. As a heavy-duty electric cargo bike built for hauling up to 450 lbs, the Voyager 2.0 is perfect for long commutes, grocery runs, and weekend adventures. However, demanding payloads and steep hills can drain power faster.
Installing an external battery pack is one of the easiest, most effective ebike upgrades to extend your ebike's range, eliminate range anxiety, and unlock the full potential of a dual battery ebike setup. With this upgrade, your Voyager 2.0 can reach a massive up to 100 miles of total range!
Follow this simple, step-by-step tutorial to learn how to install an external secondary battery on your Kingbull Voyager 2.0 safely and efficiently.
🧰 What You’ll Need for the Installation
Before you begin your dual-battery upgrade, make sure you have the following tools and components ready:
A Kingbull Toolkit (or a standard bike repair toolset)
Your official Kingbull External Battery Pack (48V Samsung cells lithium battery)
A Kingbull Battery Combiner Cable (Battery Blender)
⚙️ Step-by-Step Voyager 2.0 External Battery Installation
1. Remove the Seat:
Start by loosening the quick-release clamp underneath your ebike seat. Once it’s loose, pull the seat and seatpost completely out to safely access the controller area inside the frame of your Voyager 2.0.
2. Open the Controller Box:
Use the hex keys from your Kingbull toolkit to loosen the screws securing the controller box cover. Open the cover and carefully slide out the controller. You will see the main internal battery connection—disconnect it gently to power down the system before preparing the external battery setup.
3. Connect the Kingbull Battery Combiner:
Take your battery combiner cable (which balances the voltage between both power sources). It features three specific wires:
Connect the black connector wire directly to the ebike controller.
Connect the other two identical wires to your internal and external batteries (it does not matter which one goes to which battery).
Once securely clicked in, neatly place the controller and balancer back inside the frame housing. Then, feed the remaining long wire through the small routing opening in your bike's frame.
4. Install the External Battery Base:
Now, prepare the slide-on battery base:
Loosen the pre-installed screws on the frame bottle bosses or mounting points along the Voyager 2.0 step-thru frame.
Connect the wire protruding from the battery base to the remaining lead from your battery combiner.
Align the base plate holes with the frame and secure it firmly using four screws. Tighten them evenly to ensure your heavy-duty battery stays perfectly stable even on bumpy off-road rides.
5. Mount and Lock the External Battery:
With the mounting base securely attached, slide your external Samsung lithium-ion battery smoothly onto the track until it clicks into place. Use your key to lock it for security. Turn on the battery's physical switch to ensure it is delivering power to the system properly.
6. Reassemble and Performance Test:
Reinsert your eco-leather seatpost to your desired height and tighten the quick-release clamp. Tuck all wires safely away and secure the controller box cover tightly with its screws.
Power on your Kingbull Voyager 2.0 fat tire cargo ebike via the backlit LCD display. Confirm that the system initializes normally and both batteries are operating in harmony.
💡 Pro Tips for Ebike Dual Battery Care & Maintenance
To get the maximum lifespan out of your dual battery cargo electric bike, keep these best practices in mind:
⚠️ Voltage Matching Note: The battery combiner allows you to use both batteries together safely, but for the best efficiency and performance, try to charge both the internal and external batteries to full (100%) before heading out on a massive 100-mile ride.
Use Original Chargers: Always use the UL-certified Kingbull smart charger to prevent overcharging or degrading the high-quality Samsung cells.
Mind the Temperature: Avoid charging your ebike batteries in extreme cold (below 32°F/0°C) or extreme heat (above 104°F/40°C) to protect the lithium-ion chemistry.
Long-Term Storage: If you aren't riding your cargo ebike for a few months, store the batteries at around 50%–70% capacity and top them up once a month.
🚴 Double the Battery, Double the Freedom
Congratulations! You have successfully upgraded your Kingbull Voyager 2.0 cargo ebike into a long-range powerhouse.
With this dual-battery cargo ebike setup, you will enjoy an extended riding range, higher sustained efficiency from the custom 750W Bafang motor, and less charging downtime. Whether you are hauling heavy payloads, commuting across the city, or replacing car trips altogether, you now have the ultimate utility machine.
Ready to explore further? If you haven't picked up your secondary power pack yet, visit our official store to grab the [Kingbull Voyager 2.0 External Battery Pack] and [Battery Combiner Cable] today to supercharge your ride!
Read more
Maintenance
Complete E-Bike Maintenance Guide: Keep Your Electric Bike Like New
Why E-Bike Maintenance Matters
Electric bikes are sophisticated machines that require proper care to ensure optimal performance, safety, and longevity. Regular maintenance not only extends your e-bike's lifespan but also keeps you safe on the road.
Battery Care
Charging Best Practices
Always use the original charger provided by the manufacturer
Avoid overcharging - unplug when fully charged
Charge when battery reaches 50-70% capacity
Avoid charging in extreme temperatures (below 32°F or above 104°F)
If storing long-term, charge at least once per month
Battery Storage
Store in a cool, dry place away from direct sunlight
Maintain 50% charge level for long-term storage
Remove battery if storing bike for extended periods
Check battery connections regularly for corrosion
Mechanical Components
Chain Maintenance
Clean chain every 100-200 miles or after wet rides
Use a dedicated chain cleaner and degreaser
Apply chain lubricant after cleaning
Check chain tension and adjust as needed
Replace chain when stretched beyond manufacturer specs
Brake System
Inspect brake pads for wear regularly
Adjust brake cable tension as needed
Keep brake rotors clean and free from oil
Test brake function before each ride
Replace brake pads when worn to minimum thickness
Tire Care
Check tire pressure weekly (refer to sidewall for PSI)
Inspect for cuts, punctures, or excessive wear
Remove debris stuck in tread
Replace tires when tread depth is insufficient
Rotate tires if wear pattern is uneven
Electrical System
Controller and Display
Keep electrical components dry and clean
Check all connections for looseness or corrosion
Clean display screen with soft, dry cloth
Address error codes immediately
Protect from water during cleaning
Motor Maintenance
Keep motor housing clean and dry
Avoid riding through deep water
Check motor mounting bolts for tightness
Listen for unusual noises during operation
Have motor serviced if overheating occurs
Daily Riding Tips
Good Riding Habits
Start pedaling before engaging motor assistance
Use appropriate assist levels for terrain
Avoid sudden acceleration and hard braking
Don't exceed maximum weight capacity
Clean bike after riding in wet conditions
Storage Recommendations
Store in a covered, secure location
Use a bike cover for outdoor storage
Avoid leaving in direct sunlight for extended periods
Rotate bike position occasionally to prevent tire flat spots
Troubleshooting Common Issues
Reduced Range
Check battery health and age
Verify proper tire pressure
Assess riding conditions and habits
Consider battery replacement if significantly degraded
Unusual Noises
Check chain lubrication and alignment
Inspect brake pad position
Examine wheel bearings
Listen to motor operation
Electrical Problems
Check all connections
Verify battery charge and condition
Reset system if applicable
Consult manual for error codes
Professional Service: For complex issues or if you're uncomfortable performing maintenance, visit a qualified e-bike technician. At Kingbull Bikes, we offer comprehensive e-bike maintenance and repair services to keep your ride in perfect condition!
Read more

Maintenance
Summer E-Bike Guide: Essential Maintenance & Riding Tips to Beat the Heat
Summer's officially here, and you know what that means: longer days, epic adventures, and the perfect excuse to hit the trails on your electric bike! But as the temperatures crank up, a little extra love for your ride (and yourself!) goes a long way.
This guide is packed with expert summer e-bike riding tips and maintenance advice to keep you cruising safely and your e-bike humming happily all season long.
1. Pre-Ride Checklist: Prep Your Electric Bike for the Heat
Before heading out under the scorching sun, a quick inspection can prevent common mechanical issues caused by high ambient temperatures.
Personal Prep for Hot Weather Riding
Lightweight, Breathable Gear: Opt for light-colored, moisture-wicking fabrics (like athletic quick-dry wear) to reflect sun and keep you cool.
Sun Protection is Key: Apply high-SPF sunscreen, wear UV-protective sunglasses, and consider a wide-brimmed hat or neck gaiter for extra coverage.
Ventilated Helmet: Choose a helmet with ample vents to ensure proper airflow and head cooling.
Hydrate Strategically: Don't wait until you're thirsty—that's already a sign of dehydration. Carry plenty of water in an insulated bottle to keep it cool during your summer bike ride.
Essential Summer Bike Check
Optimize E-Bike Tire Pressure: High temperatures can cause air to expand, increasing tire pressure. Use a tire gauge to adjust to the recommended range (usually 25-30 PSI). Over-inflated tires risk blowouts, while under-inflated ones reduce efficiency.
Brake Performance: Squeeze the brake levers to check for responsiveness. Inspect brake pad wear (for both disc and V-brakes); if they are screeching or worn down, replace them promptly for safety on dry summer roads.
Battery Visual Inspection: Check your e-bike battery pack for any damage, swelling, or leaks. Ensure all connectors and charging ports are clean, dry, and free of debris.
2. During Your Ride: Smart Strategies for High-Temperature Cycling
Riding an electric mountain bike or cargo e-bike in 90°F+ weather requires a different approach to protect both the rider and the motor.
Avoid Peak Heat Hours: Whenever possible, ride during cooler times—early mornings or after sunset. Avoid the hottest hours between 10 AM and 4 PM.
Use Pedal Assist Wisely: In hot weather, utilize higher pedal assist levels to reduce your physical exertion. This keeps your body cooler and prevents the motor from over-straining during high-intensity riding. If you notice the motor or battery getting too hot, stop and let them cool down in the shade.
Watch the Road Surface: Asphalt can get extremely hot, potentially affecting tire grip. Be cautious on freshly watered roads or "bleeding" tar spots, especially when cornering.
Listen to Your Body: Dizziness, nausea, or a rapid heartbeat are signs of heatstroke. Stop immediately, rest in a cool spot, and rehydrate with electrolyte drinks.
3. Post-Ride Care: Extending E-Bike Battery Life in Summer
Proper post-ride maintenance is crucial for the longevity of your e-bike's electrical components.
Expert E-Bike Battery Care
Cool Before Charging: Never charge your e-bike battery immediately after a ride. Let the battery cool down naturally in a well-ventilated area for 30-60 minutes.
Safe Charging Environment: Always use the original charger in a dry, shaded area. Avoid charging in enclosed, hot spaces like a sun-drenched garage.
The 20-80% Rule: To extend e-bike battery lifespan, avoid draining it completely or leaving it at 100% for long periods in the heat. Keeping it between 20-80% charge is ideal for summer use.
Tire, Brake, and Drivetrain Maintenance
Tire Care: Clear dirt and debris from the treads. For long-term summer storage, rotate the wheels regularly to prevent flat spots.
General Cleaning: Summer can mean more dust and dry debris. Clean your e-bike promptly, paying special attention to the chain and drivetrain. Lubricate the chain with a dry lube to prevent dust buildup.
Avoid High Pressure: When cleaning, do not use high-pressure washers directly on the battery, motor, or electrical components. Use a damp cloth and specialized bike cleaners.
4. FAQ: Common Questions About Summer E-Biking
Q: Can I ride my e-bike in 100-degree weather? A: Yes, but keep it brief. Most e-bikes are rated for use up to 110°F (43°C), but riding in these temperatures puts extra stress on the battery and controller.
Q: Why does my e-bike's range seem lower in the summer? A: While batteries actually perform efficiently in warm weather, extreme heat can trigger thermal management protections that might slightly limit power output to protect the circuitry.
Q: How do I know if my motor is overheating? A: Signs include a noticeable loss of power, a "hot" smell, or the system shutting down automatically. If this happens, turn off the bike and move it to the shade immediately.
When to Consult Professionals for E-Bike Maintenance
Knowing when to call in the pros is crucial for keeping your ride safe. Reach out to a technician if you notice:
Strange Noises: Grinding or clicking sounds from the motor or hubs.
Brake Issues: If your brakes don't feel responsive even after home upkeep.
Electrical Hiccups: Inconsistent power or unresponsive controls. For dedicated support, contact us at customers@kingbullbike.com.
Summer Fun Awaits: Ride On, Worry-Free!
So there you have it! Summer e-biking is all about soaking up those rays and hitting the trails. By following these simple e-bike maintenance tips, you'll keep your ride performing at its best even when the mercury rises.
Now go out there, embrace the sunshine, and make some awesome summer memories on two wheels. Stay cool, ride safe, and enjoy every single mile!
Read more
Maintenance
How to Make Your E-Bike Disc Brakes Last Longer
With the growing popularity of electric bikes, more riders are realizing the importance of braking safety. Whether you're commuting daily or cruising on the weekend, your e-bike's disc brakes play a critical role in your ride experience. But how much do you actually know about them?
Let’s dive into the basics of disc brakes, common issues you may face, and some practical tips to make your e-bike braking system last longer and perform better.
What Are Disc Brakes?
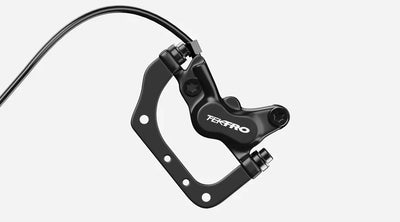
Disc brakes work by using brake pads to squeeze a rotor (disc) attached to your wheel. This friction slows the wheel down. There are two main types used in e-bikes:
1. Hydraulic Disc Brakes
Use brake fluid to transfer force.
Offer strong stopping power with minimal effort.
Great for performance and steep terrains.
Downside: More complex and requires regular maintenance to prevent leaks and keep the seals in good condition.
2. Mechanical (Cable-Pull) Disc Brakes
Use a brake cable to apply pressure on the disc.
Easier to maintain and more budget-friendly.
Suitable for city commuters and casual riders.
Downside: Can lose braking power over time due to cable stretch or friction in the cable housing.
🔍 Common Disc Brake Problems on E-Bikes
Even with regular use, disc brakes can develop issues. Here are three of the most common problems and how to fix them:
1. Brakes Feel Too Tight or Too Loose
If your brakes feel sticky or don't engage at all, the brake cable tension is likely off.
Fix: Adjust the tension knob near the brake lever.
Turn counterclockwise to tighten.
Turn clockwise to loosen.
2. Squeaky or Rubbing Brakes
This usually happens when:
The brake rotor is misaligned.
The rotor is warped due to impact or heat.
Fix: Adjust the rotor position with the mounting screws. If the disc is warped, replace it to prevent damage to other parts.
3. Weak or No Braking After a While
This is often caused by worn brake pads or stretched brake cables.
Fix: Check the pads and cables for wear and replace them as needed. Brake pads usually last between 6 months to 1 year depending on usage.
How to Maintain Your E-Bike Disc Brakes
Here’s how to keep your disc brakes in top shape and extend their lifespan:
✅ 1. Ride Smoothly – Avoid Sudden Braking
Avoid aggressive braking unless absolutely necessary. Hard braking can:
Lock the wheels and cause you to lose balance.
Wear out brake pads faster.
Overheat or warp the rotor.
Train yourself to brake gradually and anticipate stops ahead of time.
✅ 2. Regularly Inspect Brake Pads & Cables
Check your brake pads at least every 3–6 months.
Replace them when they become thin or glazed.
Inspect cables for rust, fraying, or reduced tension.
✅ 3. Protect the Brake Rotors
Keep the rotors clean and free from dirt or oil.
Avoid impacts that can bend or warp the disc.
If using mechanical brakes, keep cables well-lubricated to reduce friction and maintain responsiveness.
Final Thoughts
Disc brakes are a key safety feature for any electric bike. Whether you’re riding through city traffic or down a country trail, proper brake maintenance ensures both safety and performance. Follow these tips to keep your system reliable—and make your e-bike experience smoother and safer every time you ride.
Read more


