


Explore News

Purchase Guide
Electric Mountain Bike or Folding Electric Bike? Best Electric Bikes Under $1,000 Compared: Kingbull Hunter 2.0 vs Literider 2.0
If your daily commute involves gas costs, subway fees, traffic jams, and parking struggles, an electric mountain bike might be your most cost-effective transportation upgrade. Kingbull's Hunter 2.0 and Literider 2.0 feature a 750W power system and high-capacity battery typically found in $1,500–$2,000 models. By offering these premium specs at a sub-$1,000 price point, Kingbull has redefined what a high-value off-road ebike can be.
🔥 Quick Guide: Which One is Right for You?
Long commutes / Hilly routes / Weekend adventures → Choose Hunter 2.0 (The Full-Sized Electric Mountain Bike)
Small apartment / Need folding / Urban efficiency → Choose Literider 2.0 (The Compact Off Road EBike)
👉 Both models feature 750W powerful motors—a rare configuration in the under-$1,000 range, paired with professional-grade fat tires.
Why Choose Kingbull?
750W Power Platform: Configuration typically found in $1,500+ models.
48V 720Wh High-Capacity Battery: Real-world usable range for daily commuting.
All-Terrain Fat Tires: Equipped with 26 x 4 or 20 x 4 tires to handle sand, snow, and gravel.
Long-Term Savings: Significantly reduce gas, parking, and public transit costs.
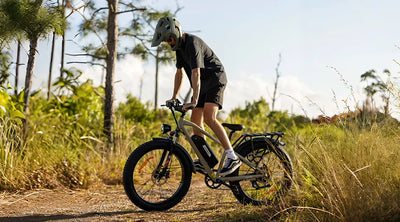
Hunter 2.0 — The Ultimate Electric Mountain Bike
Built for long-distance commuting and weekend exploration
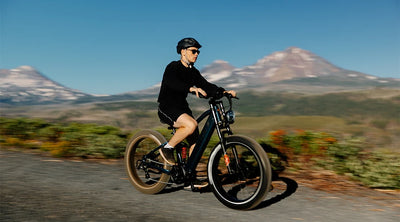
Ideal for riders who crave freedom and capability. Whether you’re commuting through hilly neighborhoods or exploring rugged weekend trails, the Hunter 2.0 is the electric mountain bike built for peak performance and comfort.
Powerful 750W Motor & 7-Speed Shimano: Effortless hill climbing and smooth rides.
Long-Lasting Battery: ~55 miles of real-world range.
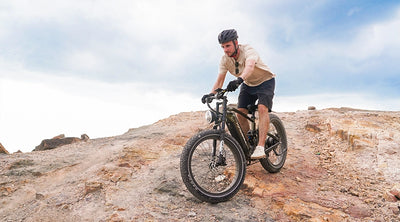
26 x 4.0 All-Terrain Fat Tires: These massive 26 x 4 tires grip pavement, gravel, mud, or sand, providing superior stability and shock absorption that smaller tires can't match.
✅ Perfect For: Long commutes, hilly routes, and outdoor enthusiasts who want a heavy-duty off-road ebike experience.
Imagine cruising past traffic jams on your way to work, then hitting a forest trail on the weekend—all on the same rugged machine.
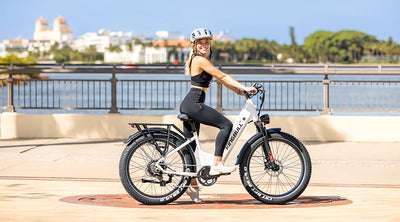
Literider 2.0 — Folding Portable E-Bike
Designed for urban commuting and small-space living
Don't let the compact size fool you. The Literider 2.0 is a versatile off-road ebike designed for urban living. Small apartments, crowded subways, or limited car trunk space? Literider 2.0 folds quickly and rides confidently in both city traffic and on unpaved paths.
30-Second Fold: Packs down compactly for easy storage in apartments, dorms, or car trunks.
20 x 4.0 Fat Tires: The 20 x 4 tire configuration offers the perfect balance between agility and traction. These 20 x 4 tires ensure you can handle potholes and dirt tracks as easily as a full-sized bike.
750W Motor & Compact Frame: Agile acceleration for stop-and-go city traffic.
✅ Perfect For: Multi-modal commuting, congested urban routes, and those who need a portable off-road ebike.
👤 Real User Feedback
Great for Commuting & Hills · Hunter 2.0:"Just WOW. As an electric mountain bike, it’s powerful, fun, and affordable! Strong hill climber and great range compared to bikes twice the price."
Perfect for Small Spaces · Literider 2.0:"Best deal on the market. The 20 x 4 tires make the ride so stable, even when I take it off-pavement. Thanks Kingbull for the awesome bikes!"
High-Frequency Rider:"These bikes are great!! Bought 2. Then 1 more. Then 2 more as gifts. Brother and family now may get. Very impressed with quality and price. Customer service has been very good. A lot of bike for the money compared to others much more expensive. Very satisfied and highly recommended."
🔍 Common Questions
Q: Are sub-$1,000 specs reliable for an off-road ebike?
A: Absolutely. Both models use the same power and battery platform as higher-priced models, with cost savings achieved through supply chain optimization without sacrificing frame durability.
Q: What is the benefit of the 26 x 4 vs 20 x 4 tires?
A: The 26 x 4 tires on the Hunter 2.0 offer better "roll-over" ability for large obstacles, ideal for a dedicated electric mountain bike. The 20 x 4 tires on the Literider 2.0 provide a lower center of gravity and better portability while still maintaining fat-tire traction.
Q: Is the range data accurate?
A: Tested under normal riding conditions with stable real-world performance.
Q: Does folding affect frame strength?
A: Tested through multiple folding and load-bearing cycles - completely reliable for daily commuting and riding.
🎯 Summary
Hunter 2.0: Long range, 26 × 4 fat tires, 7-speed control – the best budget electric mountain bike.
Literider 2.0: Quick fold, 20 × 4 fat tires, city-ready – the most versatile folding electric bike.
Both feature 750W motors, deliver exceptional value, and carry the Kingbull promise of quality.
Check the official website for current configurations and pricing.
Read more

Ebike Reviews
Kingbull EX Titan Review: The Ultimate Off-Road Electric Bike & Full-Suspension Mountain Electric Bike
The Kingbull EX Titan is a high-end full-suspension e-bike designed for riders who refuse to be limited by terrain. Whether you’re cruising city streets, tackling rugged dirt trails, or exploring gravel backroads, this off-road electric bike impresses with a balanced mix of stability, comfort, and raw power. As a premium Fat-Tire E-Bike, the EX Titan is built to handle the heavy lifting of long-distance exploration while keeping the ride smooth.
📹 See the EX Titan in Action
Before diving into the specs, check out this hands-on YouTube review demonstrating how this full-suspension fat-tire e-bike performs across multiple terrains:
🏁 Key Specifications
The EX Titan's build quality places it at the top of its class. Here is why it stands out as a versatile off-road electric bike:
Motor: Bafang 750W rear hub motor (peak 1400W)
Torque: 80–85 Nm
Battery: Samsung 48V 960Wh removable pack
Estimated Range: Up to 80 miles (128 km)
Tires: Kenda 26″ × 4.0″ all-terrain fat tires
Suspension: Full-Suspension (Zoom front fork + DNM rear air shock)
Brakes: Tektro four-piston hydraulic disc
Gearing: Shimano 8-speed
Weight: 84 lbs (38 kg)
Load Capacity: Up to 450 lbs (204 kg)
Class: Class 3 (28 mph pedal-assist), Class 2 adjustable
These specs provide a clear picture of what riders can expect, aligning closely with industry tests and expert reviews.
⚙️ Ride Performance
Power and Assistance
The heart of this off-road electric bike is the Bafang 750W motor. It delivers consistent power that makes hill climbing feel effortless. The torque-sensing system provides a natural pedaling feel, which is often missing in a heavy-duty Fat-Tire E-Bike.
Top pedal-assist speed: 28 mph (Class 3)
Throttle mode: Limited to 20 mph for quick bursts
Battery and Range
Equipped with a massive 960Wh Samsung battery, the EX Titan eliminates range anxiety. Even when utilizing the full-suspension system over bumpy terrain, power delivery remains stable. You can achieve up to 80 miles on a single charge, making it a leader in the long-distance full-suspension e-bike category.
🌄 Handling and Ride Feel
Full-Suspension Comfort
What sets the EX Titan apart from a standard Fat-Tire E-Bike is its dual-damping system.
Front: ~80–100mm travel fork
Rear: DNM air shock with ~50mm travel This Full-Suspension setup absorbs heavy impacts on gravel and trails, significantly reducing rider fatigue during long-distance adventures.
26 × 4 Fat Tires and Stability
The high-volume 26 × 4 tires act as the first line of defense against rough terrain. These tires provide a massive contact patch, offering superior traction on sand, snow, and loose dirt. While they produce a slight hum on pavement, the stability they offer makes this the ultimate off-road electric bike for unpredictable conditions.
🚴 Recommended Use Cases
City Commuting: ⭐⭐⭐⭐Great for urban rides and short trips. Acceleration is slightly affected by the bike's weight and fat tires, but it remains stable, comfortable, and reliable for daily commuting.
Long-Distance Touring: ⭐⭐⭐⭐⭐Perfect for extended rides. With a powerful motor, large battery, and comfortable suspension, the EX Titan excels on long-distance touring.
Sand and Snow: ⭐⭐⭐⭐⭐Exceptional performance on sand, snow, and soft or loose surfaces. The fat tires provide excellent traction and stability, making it versatile in challenging conditions.
Technical Trail Riding: ⭐⭐⭐Suitable for light trails and mixed-terrain paths, but not intended for aggressive technical trails or high-speed competitive racing. The bike prioritizes comfort and versatility over extreme agility.
📊 Pros & Cons
✅ Pros
Powerful motor with a natural-assist feel.
Industry-leading battery range (960Wh).
Full-Suspension system for maximum comfort.
High-traction 26 × 4 fat tires.
❌ Cons
Relatively heavy at ~84 lbs.
Large footprint makes it harder to transport without a dedicated rack.
🏁 Conclusion
The Kingbull EX Titan is a versatile full-suspension fat-tire e-bike that perfectly balances power and comfort. It may not be the lightest bike on the market, but as an off-road electric bike, it excels for riders looking to explore further and ride longer.
If you are looking for a rugged full-suspension e-bike that can transition from city streets to mountain paths, the EX Titan is a compelling choice.
Ready to start your adventure? [Check out the EX Titan here] or browse our complete Fat-Tire E-Bike collection today.
References
This review incorporates insights from industry experts. For a detailed technical analysis, visit the comprehensive review by Electric Bike Journal, a trusted voice in the e-bike community.
Read more

Tips & Cycling Knowledge
A Beginner’s Guide to Riding Electric Bikes: Everything You Need to Know
With the continuous development of society and advancements in technology, the emergence of electric bicycles has brought us a fresh cycling experience. However, before embarking on a ride, it is crucial to understand how to operate it safely. Whether you are riding a long-range electric bike for commuting or an all-terrain e-bike for off-road adventures, this guide will help you begin your journey safely and confidently.
What is an Electric Bicycle?
An electric bicycle, commonly known as an e-bike, is a bicycle equipped with an integrated electric motor and a rechargeable battery. This motor is designed to assist your pedaling efforts, making it easier to face steep inclines or travel at faster speeds.
Modern e-bikes come in various styles. For those looking for stability and comfort on any surface, fat tire electric bikes have become a top choice. A high-quality Kingbull electric bike, for example, combines power with ergonomic design to cater to both city streets and rugged trails.
Understanding E-Bike Functions and Performance
E-bikes offer a range of capabilities that enhance convenience. Here is a breakdown of what makes a Kingbull e-bike stand out:
Electric Assist System
The core of any e-bike is the assist system. Riders can adjust the intensity via a control panel. High-performance models like the Kingbull electric bike offer multiple assist levels, allowing you to tailor the power to your specific riding conditions, such as heavy headwinds or steep hills.
Range and Battery Life
If you are looking for a long-range electric bike, battery capacity is key. The distance you can travel on a single charge is influenced by terrain, rider weight, and the chosen assist level. Energy-efficient riding can extend this range significantly, making long-distance journeys a breeze.
Versatile Uses & All-Terrain Performance
Electric bicycles are suitable for urban commuting, leisure, and cargo transportation. For riders who enjoy exploring beyond the pavement, an all-terrain e-bike is essential. Models like fat tire e-bikes provide the necessary grip and shock absorption to handle sand, snow, and gravel.
Essential Preparations: Things To Do Before Riding
Before your first ride on a high-performance Kingbull electric bike, several essential preparations are necessary to ensure a safe, smooth, and enjoyable journey. Whether you are prepping for a city commute or an off-road adventure on an all-terrain e-bike, follow these key steps:
1. Check the Smart Display
First, confirm that the e-bike's display screen is functioning correctly. The interface on your Kingbull e-bike typically shows vital real-time data such as current battery level, pedal-assist level, speed, and total mileage. Ensure the display is readable and set to your preference so you can easily access information while navigating traffic or trails.
2. Battery Management for Long-Range Travel
To get the most out of a long-range electric bike, you must start with a full charge.
Charge the Battery: Ensure the battery has sufficient capacity to support your planned route.
Insert and Lock: Slide the battery correctly into the e-bike's integrated compartment. For Kingbull models, ensure it clicks and is securely locked in place to prevent power loss or theft during your ride.
3. Comprehensive Bike Inspection
A thorough mechanical check is vital, especially for heavy-duty fat tire electric bikes that handle more torque and weight.
Brake System: Test the brake levers to ensure they operate responsively. Check that the pads have enough thickness left. High-speed riding on an e-bike requires reliable stopping power.
Tire Pressure: For an all-terrain e-bike, tire pressure is crucial. Inspect the tires to ensure they are inflated to the recommended PSI range. Proper pressure on fat tire e-bikes enhances stability, grip, and battery efficiency.
Gears and Chain: Inspect the drivetrain. Ensure the chain is clean, well-lubricated, and free from debris. Proper lubrication extends the lifespan of your Kingbull electric bike and ensures smooth gear shifting.
4. Helmet and Safety Gear
Wear a Helmet: Never embark on a ride without a certified helmet. This is the most crucial piece of safety gear, providing vital protection for your head. Ensure it is fastened snugly.
Additional Protection: Depending on the terrain—especially when taking fat tire electric bikes off-road—consider wearing gloves for grip, protective eyewear against wind/debris, and a reflective vest for high visibility.
5. Familiarize Yourself with E-Bike Operations
Before hitting the road, take a moment to understand the specific controls of your Kingbull e-bike.
Control Mastery: Practice switching between assist levels and understand how the throttle (if equipped) engages.
Brake Feel: Test the brakes at a low speed to get a feel for the pressure required. Electric bikes often feature motor-cutoff switches in the brakes, so it’s important to understand how they react.
Safety Guidelines: Attention During the Ride
Riding an all-terrain e-bike is a thrilling experience, but maintaining safety is paramount. Pay close attention to these factors while in motion:
1. Strictly Follow Traffic Laws:
Adhere to all local regulations, including speed limits, traffic signals, and bicycle lane markings.
2. Maintain Constant Vigilance:
Stay alert to your surroundings. Because a long-range electric bike can reach higher speeds than a traditional cycle, extra caution is needed. Use mirrors to check your blind spots before changing lanes or turning.
3. Adapt to Electric Assistance:
Start with a low assist level to get accustomed to the acceleration. Avoid using maximum power on steep downhill slopes or sharp turns to maintain total control.
4. Strategic Braking:
Avoid abrupt "panic" braking. E-bikes are heavier, and fat tire electric bikes may have different traction levels; give yourself plenty of space to slow down gradually.
5. Appropriate Footwear:
Wear closed-toed shoes with a good grip to ensure your feet stay firmly on the pedals, especially when riding over bumpy terrain on an all-terrain e-bike.
6. Battery Monitoring:
Keep an eye on your display. If your battery runs low, your long-range electric bike may lose its assist power, making the return trip much more physically demanding.
7. Weather and Road Surface:
Exercise extreme caution on wet, slippery, or muddy trails. Fat tire e-bikes offer great traction, but speed should still be reduced in adverse weather to prevent skidding.
8. Route Planning:
When exploring new areas, plan your route to include bike-friendly paths and know where charging stations are located if you plan to push your Kingbull e-bike to its range limits.
Post-Ride Care: Maintaining Your Investment
After finishing your journey, follow these steps to ensure your Kingbull electric bike is ready for the next adventure:
1. Power Down:
Immediately turn off the electric assist system. This prevents accidental acceleration when moving the bike and helps preserve the battery's health.
2. Smart Charging:
Connect the battery to its official charger. For the best longevity, try to keep the battery in a climate-controlled environment and avoid leaving it at 0% for long periods.
3. Detailed Post-Ride Inspection:
Look for any loose bolts or debris caught in the wheels. Since all-terrain e-bikes encounter more dirt and vibration, a quick 2-minute check can prevent future repairs.
4. Cleaning and Lubrication:
Wipe away dust and mud from the frame and motor casing. Keeping your fat tire electric bikes clean prevents corrosion and maintains the "like-new" look of your Kingbull.
5. Secure Storage:
Store your e-bike in a dry, well-ventilated space. Avoid leaving it in direct sunlight or freezing temperatures, as extreme heat/cold can damage battery cells. Always use a high-quality lock to prevent theft.
6. Maintain Maintenance Records:
Track your mileage. Regular professional check-ups every 500-1000 miles (depending on the manufacturer's recommendation) will keep your long-range electric bike performing at its peak.
7. Accessory Care:
Store your charger, keys, and any removable displays in a dedicated, safe location so they are ready for your next ride.
Pro Tips for E-Bike Success
Familiarize Yourself: Read your Kingbull electric bike manual to understand maximum speed and riding modes.
Control Your Speed: Don't chase extreme speeds; adapt to the road environment.
Maintain Balance: E-bikes have a different center of gravity than traditional bikes. Practice turns in a safe area first.
Proper Posture: Keep your upper body upright and elbows relaxed to reduce fatigue.
By following these comprehensive steps, you ensure that every ride on your Kingbull electric bike is safe, efficient, and exceptionally fun!
Summary
Electric bicycles provide a convenient, eco-friendly way to commute. By choosing a reliable long-range electric bike and following safety protocols, you can enjoy a seamless riding experience. Whether you prefer the ruggedness of fat tire electric bikes or the versatility of an all-terrain e-bike, safety and regular maintenance remain the top priorities.
Read more

Purchase Guide
From Sold Out to Back in Stock: Is the Hunter 2.0 Worth It?
From Sold Out to Back in Stock: Is the Hunter 2.0 Worth It?
Hunter 2.0 was a Black Friday sellout and pre-order sensation—now it's finally back in stock! Is this highly anticipated e-bike worth the hype? We break down the three key reasons to buy and who it's perfect for.
✅ Why Hunter 2.0 Stands the Test of the Market
A Mature Product Line
Hunter 2.0 isn't an experimental release—it's a comprehensive upgrade built on the success of Hunter 1.0. Every improvement is based on real user feedback, and every component has been rigorously tested and validated.
Validated by Hundreds of Riders
Since Black Friday, hundreds of riders have become Hunter 2.0 owners. Their daily commutes, long-distance rides, and varied terrain tests have all proven this bike's reliability and outstanding performance.
Core Performance Highlights
Powerful 750W Motor: Delivers exceptional torque and hill-climbing capability, making steep inclines effortless
Extended Range Battery: Up to 55+ miles per charge, perfect for long commutes and weekend adventures
Premium Suspension System: Front fork suspension and seat post shock absorption ensure a smooth, comfortable ride on any terrain
Hydraulic Disc Brakes: Reliable stopping power in all weather conditions for maximum safety
Fat Tire Design: 4-inch all-terrain CST tires provide superior traction and stability on roads, trails, and sand
Smart Display: Intuitive LCD screen shows speed, battery level, distance, and riding modes at a glance
💬 What Riders Are Saying
Don't just take our word for it—here's what real Hunter 2.0 owners are experiencing:
"King Bull Hunter 2.0. Deep in the woods having a blast!!! Get you one. You won't b disappointed." - Bubba Painter
YouTube Review Highlight: E Rides channel featured our Hunter 2.0 with 266K views, praising it as a 'nice bicycle fully loaded and basically ready to go.'
"Best bang for your buck!! I've been waiting and researching for an ebike for a while when I came across The Kingbull Hunter 2.0. I've seen that so many of the ones sold on Amazon & other sites have horrible customer service. Kingbull helped me with every question. If your looking and want something affordable, durable & great when you have questions....Kingbull says it in the name King all the way around 👍👍" - Daniel Rehem ⭐⭐⭐⭐⭐
"I was skeptical at first, but after around 15 miles, I absolutely love this Hunter 2.0! I bought it along with some accessories - a water bottle holder and front bag - and they've been incredibly useful. My wife and I are both thrilled with the bike. I had a friend try it out, and now he's planning to get one too!" - Dalton Anderson ⭐⭐⭐⭐⭐
Trusted by thousands of satisfied customers! Our customers love the Hunter 2.0's performance, value, and versatility across all terrains.
🎯 Who Should Buy Hunter 2.0?
Hunter 2.0 is perfect for you if:
You crave adventure - from weekend trail rides to off-road exploration and backcountry expeditions
You need a versatile workhorse for property maintenance, hauling gear, or outdoor tasks
You need a reliable daily commuter that can handle 20-50 mile trips
You're seeking premium features and proven performance without the premium price tag
You value real-world reliability backed by hundreds of satisfied riders and professional reviews
⏰ Don't Miss Out Again
Hunter 2.0 sold out during Black Friday and had a waitlist during pre-orders. Now that it's back in stock, inventory is moving fast. Secure yours today before the next sellout!
Ready to join the Hunter 2.0 family? Shop Hunter 2.0 Now →
Read more

Purchase Guide
Mid-Drive vs. Hub Motor E-Bikes: Which is Right for Your Next Kingbull Adventure?
When choosing an electric bike, the motor type is the single most important factor affecting performance, riding feel, maintenance, and price. In today’s market, the two dominant systems are mid-drive motors and hub motors.
Understanding how these systems work—and which one delivers the highest value—is the key to making a smart investment. In this comprehensive guide, we’ll break down the key differences and explain why the high-torque motors equipped on Kingbull e-bikes offer the best cost-effectiveness for your daily rides.
What Is a Hub Motor E-Bike?
A hub motor is integrated directly into the wheel (most commonly the rear wheel on Kingbull models). Because the motor drives the wheel directly, it provides electric assistance independently of the bike’s chain or gears.
The Riding Experience Hub motors deliver smooth, predictable power that is especially noticeable during takeoff and steady cruising. This "push" sensation makes them the go-to choice for city commuting, beach cruising, and relaxed long-distance exploration.
Advantages of Hub Motors
Unbeatable Value: Lower manufacturing costs translate to more affordable retail prices for riders.
Minimal Maintenance: Since the motor bypasses the drivetrain, there is no extra strain on your chain or gears. Even if your chain breaks, the throttle can still get you home.
Reliability: With fewer moving parts and a sealed housing, these motors are built to last.
Versatility: Perfect for flat roads, gravel paths, and moderate inclines.
Limitations
Less efficient on very steep hills
Heavier wheel can slightly affect handling
Power delivery feels more “electric” than “pedal-like”
What Is a Mid-Drive Motor E-Bike?
A mid-drive motor is mounted at the bike’s center, right between the pedals (the crankset). It drives the bike through the chain, leveraging the bike’s existing gears to multiply torque.
The Riding Experience Mid-drive motors offer a very "natural" feel because the power is tied to your pedaling cadence. They are highly responsive, making them a favorite for technical off-road trails and extreme vertical climbs.
Advantages of Mid-Drive Motors
Extreme Hill Climbing: By using the bike's gears, these motors can conquer incredibly steep terrain.
Centralized Weight: Placing the motor low and in the middle improves the bike's balance for technical maneuvers.
Limitations
Significantly higher price
More wear on chain and cassette
More complex maintenance and servicing
Hub Motor vs Mid-Drive: Detailed Comparison
Feature
Hub Motor (Kingbull)
Mid-Drive Motor
Motor position
Integrated into the wheel hub
Mounted at the crankset
Riding feel
Smooth and predictable
Natural and sporty
Hill performance
Good for urban inclines
Excellent for steep climbs
Maintenance
Low, simple upkeep
Medium to high
Weight distribution
Weight concentrated in the front or rear wheel
Weight centralized in the middle of the frame
Price
More budget-friendly
Premium
Best use cases
Commuting, leisure, everyday riding
Trails, mountain riding, cargo hauling
At Kingbull, we focus on what most riders actually need: reliable power, durability, and excellent value.
By using high-quality 750W Bafang rear hub motors, Kingbull e-bikes offer:
Strong torque for daily riding and urban hills
Longer-lasting drivetrains with less maintenance
Competitive pricing without sacrificing performance
A smoother, quieter ride ideal for everyday use
Why Kingbull Specializes in High-Performance Hub Motors
At Kingbull, we focus on what real-world riders actually need: reliable power, long-term durability, and unmatched value. By equipping our e-bikes—like the Kingbull Hunter 2.0 and Literider 2.0—with premium 750W Bafang rear hub motors, we deliver:
Massive Torque: Optimized for quick acceleration and conquering urban hills with ease.
Drivetrain Longevity: Your chain and cassette will last significantly longer compared to mid-drive systems.
Affordable Excellence: We provide premium specs (like Samsung batteries and hydraulic brakes) without the inflated "mid-drive" price tag.
All-Weather Reliability: Our sealed hub systems are ideal for the diverse conditions encountered by fat tire e-bike riders.
Which one is right for you?
Hub motors are better suited for:
Urban commuting
Leisure and recreational riding
First-time e-bike buyers
Riders who want minimal maintenance and hassle-free ownership
Mid-drive motors are better suited for:
Frequent steep hill climbing
Off-road and mountain riding
Experienced riders who demand a more refined riding experience
For the majority of riders—commuters, weekend explorers, and casual cyclists—a hub motor delivers the best balance of performance and price.
Mid-drive motors excel on demanding terrain—but they come with a higher price tag. Kingbull e-bikes deliver the perfect blend of power, reliability, and affordability to meet your real-world riding needs.
👉 If you want a high-value electric bike without paying a premium, Kingbull’s e-bikes are the perfect solution. ⚡🚲
Final Verdict
For the vast majority of riders, a high-quality hub motor delivers the ultimate balance of performance and price. While mid-drive motors excel in niche, extreme terrains, Kingbull e-bikes are engineered to meet your real-world needs with power, reliability, and affordability.
👉 Ready to experience the Kingbull difference? [Explore our 750W E-Bike Collection here] and find your perfect ride today! ⚡🚲
Read more

Purchase Guide
Perfect Electric Bikes for Shorter Riders: Our Top 3 Picks
Why Shorter Riders Need Special Consideration
For shorter riders, choosing the right electric bike is crucial. Frame height, seat adjustment range, and overall geometry directly impact riding comfort and safety. Today, we're recommending three electric bikes that are particularly well-suited for shorter riders.
1. Kingbull Literider 2.0 - All Terrain Folding Electric Fat Bike
Suitable Height Range: 5'2" - 6'6"
The Literider 2.0 is a folding electric fat bike designed for diverse riding needs. Its foldable design not only makes storage and transport convenient, but more importantly, its frame design is very friendly to shorter riders. The fat tires provide excellent stability and traction, giving you confidence on various terrains. With a minimum height requirement of just 5'2", it's one of the most accessible options for shorter riders.
Key Advantages:
Foldable design for easy adjustment and storage
Low step-through frame for easier mounting and dismounting
Fat tire design provides better balance
Perfect for urban commuting and off-road adventures
Accommodates riders as short as 5'2"
2. Verve - Flexible and Comfortable Choice
Suitable Height Range: 5'2" - 6'6"
The Verve is renowned for its excellent adjustability and comfortable riding experience. This model pays special attention to ergonomic design, with both seat and handlebars precisely adjustable according to rider height, ensuring even shorter riders can find their most comfortable riding position. With a minimum height requirement of just 5'2", it's one of the most accommodating options for shorter riders.
Key Advantages:
Highly adjustable seat system
Ergonomic design
Relaxed riding posture
Ideal for daily commuting
Comfortable riding starting at 5'2"
3. Kingbull Voyager 2.0 - Fat Tire Electric Cargo Bike
Suitable Height Range: 5'2" - 6'6"
The Voyager 2.0 is a powerful electric cargo bike, but don't let the "cargo" label intimidate you. Its design also considers riders of different heights. The low center of gravity and stable fat tire configuration allow shorter riders to easily handle this practical electric bike. Also supporting riders from 5'2", even shorter individuals can safely control this bike.
Key Advantages:
Low center of gravity design for easier control
Fat tires provide exceptional stability
Powerful cargo capacity
Perfect for family shopping and daily use
Easy to handle even at 5'2"
Height Comparison & Buying Guide
Great news for shorter riders! All three models accommodate riders starting at 5'2", giving you the freedom to choose based on your specific needs rather than height limitations:
Literider 2.0 - Perfect if you need foldable portability and all-terrain riding capability
Verve - Ideal if you prioritize comfort for daily commuting
Voyager 2.0 - Best choice if you need cargo capacity for family use
Pre-Purchase Fit Checklist
Before purchasing, shorter riders can use this quick checklist to ensure the best fit:
Make sure the minimum seat height matches your inseam length
Check that the frame design (especially step-through) is easy for you to mount and dismount
Look for bikes with stable geometry and wider tires for added balance
Review the recommended rider height range (5'2"–6'6" for all three models)
Confirm handlebar and seat adjustability to ensure a comfortable upright posture
These three electric bikes have been carefully selected as excellent choices for shorter riders. Whether you're commuting daily, exploring on weekends, or shopping for the family, you'll find the perfect match.
Shop now and take advantage of our limited-time Christmas offers — the perfect moment to get your ideal electric bike.
Read more