










Explore News
Kingbull News
Kingbull Unleashes the Most Powerful Full-Suspension Street-Legal eMTB – BAFANG-Powered EX Titan with 128-Km Range
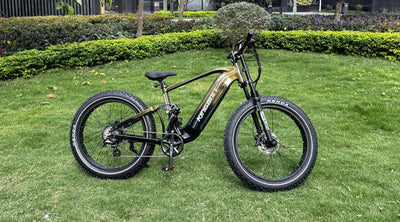
KINGBULL, the fat tire electric bike expert, proudly introduces the EX Titan, the most powerful model in its lineup and the latest addition to the Forge Series — a new high-end range built to push the limits of technology and rideability. Powered by BAFANG, armed with full suspension, and engineered for extended range, the EX Titan is Kingbull’s ultimate trail-and-street conqueror.
Full Suspension Meets Maximum Street-Legal Power
Engineered around a 4-bar full suspension system, the EX Titan delivers premium comfort and stability whether you're tackling mountain trails or pothole-ridden urban streets. The front is equipped with a ZOOM 879DH hydraulic spring fork offering 80mm of travel, while the middle features a DNM AO-38RC air shock with 50mm travel — an elite combination reserved for powerful mountain bikes.
At its heart is the BAFANG G062 hub motor, delivering up to 85Nm of torque(80Nm typical) while maintaining Class 3 road legality (adjustable to Class 2). Coupled with a Samsung 960Wh lithium battery, riders can expect up to 80 miles (128 km) on a single charge, making it ideal for both long-range adventure and demanding daily rides.
Unlike most e-bikes that use 2-piston systems, KINGBULL equips the EX Titan with 4-piston hydraulic disc brakes for significantly stronger and smoother braking. This setup is not only more durable but also easier to maintain—giving riders more confidence and control on every ride.
EX Titan Technical Specifications
Frame & Series: 4-Bar Linkage, Step-over frame, all aluminum, part of Kingbull’s new Forge Series
Suspension: ZOOM 879DH coil spring front fork (80mm), DNM AO-38RC air rear shock (50mm)
Motor: BAFANG G062 750W hub motor, 85Nm torque (80Nm typical)
Battery: Samsung 48V 960Wh lithium battery
Range: Up to 80 miles (128 km)
Brakes: Tektro HD-E3940 4-piston hydraulic brakes, 180mm discs
Drivetrain: Shimano 8-speed system
Tires: Kenda 20"x4.0" puncture-resistant fat tires
Sensor: Torque Sensor
Display: KB35H color display, torque sensor
Lighting: 48V LED front and taillights with integrated horn and brake light
Class: Street-legal Class 3 (adjustable to Class 2)
What’s It For?
The EX Titan is designed for those who demand more — more power, more comfort, more range. Whether you're navigating rugged mountain trails or enduring long city commutes, this full-suspension Class 3 eMTB brings the best of both worlds: trail-ready toughness and street-legal compliance. Its 85Nm BAFANG motor, dual-suspension setup, and 80-mile range make it ideal for performance-focused riders, heavier users, or anyone seeking maximum riding confidence.
“At KINGBULL, we created the Forge Series to push the boundaries of what an electric bike can offer,” said the Kingbull spokesperson. “The EX Titan is our answer to riders asking for full-suspension capability without sacrificing street legality, comfort, or battery life. It’s a new benchmark for versatility — and a bold step forward in our commitment to giving every rider more choices at the top end.”
Pre-Orders Begin, Rides Start in May
EX Titan is now open for pre-order at a special launch price of $1,999 (MSRP $2,599). The bikes will begin shipping by June, and Kingbull's plans to invest $10 million in a nationwide test ride and service network to provide better service, with riders able to test ride the service at their nearest bike store after June.
The EX Titan will be available in a green and black gradient color through Kingbull's online store and authorized dealers.
The new Forge Series, led by EX Titan, extends that vision by offering high-performance, full-suspension models built with industry-leading technologies. With state-of-the-art components and an eco-conscious mindset, Kingbull inspires riders to break the mold and unleash the joy, staying true to the brand’s belief:
Your Ride. Your World. Your Way.
For more information, visit https://www.kingbullbike.com/ or contact 213-588-4335.
Read more
Kingbull NewsPurchase Guide
New Release | KINGBULL JUMPER GO: Full-Suspension 20" Off-Road E-Bike with $600 Early Bird Discount!
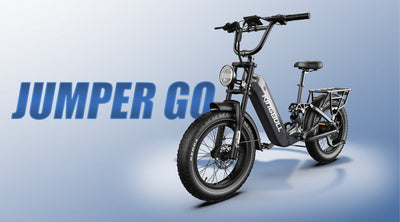
At KINGBULL, we believe true freedom begins where the pavement ends. That’s why we’re proud to launch the all-new JUMPER GO — a purpose-built 20-inch full-suspension electric bike designed for off-road riders who demand power, performance, and precision.
Now available for pre-order with a $600 early bird discount, this beast is ready to take your adventure to the next level.
Engineered for Off-Road Performance
JUMPER GO isn’t a commuter toy — it’s a trail-ready machine packed with pro-level components built for the wild:
Kenda 20" x 4.0" fat tires for traction across sand, snow, mud, and mountains
Bafang 750W high-torque motor to climb steep hills and power through rough terrain
Full suspension system:
Front: Zoom suspension fork with 80mm travel
Rear: DNM rear shock with 50mm travelThis setup absorbs big bumps, keeping your ride smooth and stable
Tektro 4-piston hydraulic disc brakes for confident, responsive stopping in any condition
Whether you're tearing up the trails or exploring backcountry paths, JUMPER GO delivers the muscle and control you need.
Samsung 20Ah Battery — Up to 80 Miles Per Charge
Range anxiety? Not here.
JUMPER GO comes equipped with a Samsung 20Ah high-capacity battery, offering up to 80 miles (128 km) of range on a single charge. Ride farther, explore deeper, and go where others can't.
Who Is JUMPER GO For?
This e-bike is made for riders who want more than city cruising:
Trail enthusiasts and off-road adventurers
E-bike riders craving power, range, and rugged reliability
Anyone who demands a high-performance electric bike without compromise
Early Bird Deal: Save $600 Now!
Be the first to ride the JUMPER GO and enjoy our exclusive early bird pre-order offer: $600 off for a limited time only!
Don’t miss out — availability is limited and demand is high.
Pre-Order Now and Ride Beyond Limits
The adventure starts here. Whether you're heading to the mountains, desert, or forest trail, JUMPER GO is your ultimate off-road companion.
👉 Click here to pre-order the JUMPER GO now >>
Read more
Kingbull News
KINGBULL Unveils the Verve and Jumper Go: Best Urban Commute and Off-Road Electric Bikes
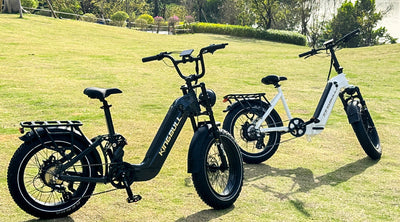
KINGBULL, the fat tire electric ebike export, proudly launches two next-generation step-through e-bikes—Verve and Jumper Go—designed to meet the demands of both city commuters and off-road explorers. Crafted with all-aluminum frames and powered by 750W Bafang motors, these models blend performance, portability, and comfort in distinct ways.
Pre-orders are open now, with deliveries starting in May 15th. Riders can also experience both models in person at KINGBULL’s test ride spot.
Luxury, Powerful, and Rider-Focused
At the core of both the Verve and Jumper Go is a meticulously engineered aluminum step-through frame with all the industry's top-level technology, featuring:
A removable, integrated SAMSUNG 48V/960Wh battery
Torque and brake sensors for responsive riding
TEKTRO HD-E3940 4-piston hydraulic brakes with 180mm discs
SHIMANO 8-speed drivetrain
20”x4.0” KENDA puncture-proof tires for stability and grip
ZOOM 80mm travel front fork
From urban streets to rugged trails, every component is chosen for performance and reliability.
Verve: Foldable Freedom for the Urban Explorer
Ideal for city commuters, the Verve is a Class 2*, foldable e-bike that combines sleek form with functional design. The frame folds easily for compact storage in apartments, offices, or transit.
The Verve offers smooth acceleration up to 20MPH, while the 80mm front suspension fork absorbs bumps in the road.
* Legal! Adjustable!
Jumper Go: Built to Conquer All Terrains
Designed for adventure, the Jumper Go takes things up a notch with a mid-mounted DNM air suspension and Class 3 performance. Its 750W bafang hub motor delivers high torque and speeds up to 28MPH, perfect for trail riders and thrill-seekers.
Despite its rugged nature, Jumper Go retains comfort features like eco-leather saddles, ergonomic grips, and an intuitive folding stem.
Built for Real Riders – From Rugged Trails to City Streets
Jumper Go & Verve aren’t just e-bikes—they’re the perfect fit for riders with different lifestyles:
Best for All-Terrain CommutersJumper Go is made for those who want both speed and comfort. From urban roads to bumpy trails, it’s ideal for riders who crave performance with a smooth ride.
Best for City Explorers & Space-SaversVerve is perfect for urban dwellers, apartment owners, and RV travelers. Its foldable design and relaxed riding geometry make it the go-to for convenient daily transport.
Best for New Riders & Everyday UseWith easy step-through frames, both models are welcoming to riders of all ages and experience levels—great for commuting, errands, or just enjoying the ride.
Best Choice for Practical StyleWhether you’re drawn to Jumper Go’s bold blue or Verve’s clean white, both offer modern looks with everyday functionality.
Join the Celebration!
To celebrate the launch, you can get up to $600 off your order starting now. VERVE has an Early Bird price of $1,799 (reg. $1,999), while the full-suspension JUMPER GO is $1,899 (reg. $2,499).
About KINGBULL
Since its brand launch in 2023, KINGBULL has become a trusted name in the electric bike industry. From the Voyager, the world's first dual battery cargo electric bike, to the commuter-focused Discover and popular folding ebike Literider, as well as the Hunter line, which is built on user feedback, KINGBULL's product line caters to a wide range of riding scenarios.
With state-of-the-art products and eco-friendly bikes, we aim to inspire people to break the mold and unleash the joy, just like our philosophy Your Ride. Your World. Your Way.
For more information, visit www.kingbullbike.com or contact 213-588-4335.
Read more
Tips & Cycling Knowledge
Say Goodbye to Post-Ride Butt Pain: Here's How!
Hey there, fellow cycling enthusiasts! We’ve all been there—you finish an amazing ride, but the next day your butt feels like it went to war. Don’t worry—we’re here to help. In this post, we’ll break down why it happens, how to prevent it, and what to do if you're already sore. Let’s ride smart and pain-free!
The Science of Butt Pain
When you’re on your bike, your sit bones carry most of your weight. Over time, that pressure can restrict blood flow and irritate soft tissues. Add in the constant friction between your skin and the saddle—and boom—pain, soreness, and even inflammation.
Pre-Ride Prevention
1. Choose the Right Saddle
Fit matters: Measure your sit bones to find the right width.
Riding style counts: Narrow saddles = speed and flexibility. Wide saddles = comfort and long distances.
Ventilation helps: Saddles with airflow (like the Hunter 2.0 model) keep you dry and cool.
Material matters: Gel = shock absorption. Memory foam = custom comfort.
2. Check Your Handlebar Height
Too low? You lean forward and overload your hips.
Too high? Your posture suffers.Find the sweet spot for even weight distribution.
3. Adjust Saddle Height
Small changes can make a big difference. Adjust to your comfort during the ride and based on terrain.
Wear the Right Clothing
- Moisture-Wicking Tops
Skip the cotton! Choose polyester or nylon blends that dry fast and keep you comfortable.
- Cycling Shorts, Trousers, or Capris
Padded shorts are your best friend. For cooler rides, go with breathable, wind-resistant trousers.
- Proper Sports Underwear
Ladies: supportive sports bras.Gents: sweat-wicking base layers.Everyone wins with breathable, stretchy materials.
- Wind-Proof Jackets & Breathable Socks
Dress for the weather and protect your skin. Don’t forget reflective details for night rides!
Prepare Your Body
Warm-Up Exercises: Get those muscles moving before hitting the road.
Core Training: A stronger core = better posture = less butt pain.
During the Ride
- Switch Up Your Sitting Position
Stand up every 15–20 minutes or shift side to side to reduce pressure points.
- Pedal Smart
Aim for a smooth cadence of 80–100 RPM. Less impact, more efficiency.
- Plan Your Route
Schedule short breaks every 30–60 minutes. Use that time to stretch and let your muscles recover.
After the Ride: Recovery Tips
- Move Around
Don’t just crash on the couch. A short walk helps circulation and speeds up recovery.
- Try Heat or Cold Therapy
Heat: Use a warm compress to relax tight muscles.
Cold: Ice packs reduce swelling and numb pain (especially in the first 48 hours).
- Pain Relief
Over-the-counter meds like ibuprofen can help, as can anti-inflammatory creams or gels.
Bonus Tips for a Happier Ride
Stay Clean: Shower ASAP after riding. Keep your skin dry to prevent irritation.
Inspect Your Gear Regularly:
Saddle: Any cracks or deformities? Replace it!
Shorts: Is the padding worn out? Time for new ones.
Tires, brakes, gears: Always check before hitting the road.
Final Thoughts
The freedom of the ride is one of life’s simple joys—but it doesn’t have to come with discomfort. With the right gear, smart habits, and proper recovery, you can say goodbye to post-ride butt pain for good.
So check your setup, dress for the ride, and keep pedaling with joy. The open road is calling!
Read more
Ebike Comparison
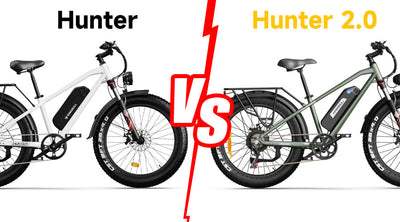
Hunter 2.0 Upgrade Breakdown: Redefining the Cycling Experience
As technology continues to advance, cycling equipment is constantly evolving to provide riders with the best experience possible. Today, we’re excited to introduce the newly upgraded Hunter 2.0! This bike has long been a favorite among cycling enthusiasts, and it now offers even more power, comfort, and durability. Not only has the design been fine-tuned, but the performance has also been taken to a whole new level. From the motor and front fork to the braking system, frame, saddle, and rear rack, every aspect of the Hunter 2.0 has been meticulously upgraded and tested to deliver a smoother, safer, and more comfortable ride. Let’s take a closer look at the key improvements!
1. Motor Upgrade: More Power, Longer Lifespan
The Hunter 2.0 now features the renowned Bafang motor, known for its powerful performance and reliability. The upgraded motor delivers stronger power output, and the newly designed gears are more durable and wear-resistant, extending the motor’s lifespan. This means that whether you’re conquering rough mountain trails or cruising along city streets, the Hunter 2.0 will provide you with continuous, reliable power, ride after ride.
2. Front Fork Upgrade: A Smoother, More Comfortable Ride
The performance of the front fork plays a crucial role in your comfort and stability while riding. In the Hunter 2.0, we've upgraded the front fork to the MOZO brand, which features an 80mm travel for enhanced shock absorption. This upgrade ensures a smoother ride, absorbing bumps and vibrations from rough terrain. Whether you're navigating rocky trails or riding on uneven city streets, the MOZO front fork guarantees a more stable, comfortable experience—especially on longer rides.
3. Braking System Upgrade: Enhanced Safety and Precision
To ensure your safety, the Hunter 2.0 has upgraded its braking system from mechanical to hydraulic disc brakes, now featuring a dual-piston design. This setup provides superior braking performance with smoother and more precise control. Whether you need to make a quick stop or a gradual slowdown, the hydraulic system delivers exceptional response time and reliability, keeping you safe in all riding conditions.
4. Frame Upgrade: Stronger, More Durable, and Ready for Any Ride
The Hunter 2.0 features cutting-edge welding and casting technology that enhances the overall strength and durability of the frame. This advanced technique ensures a perfect fit at every weld point, increasing the frame’s stability and resilience. Compared to traditional welding methods, the casting process helps to better distribute external forces, reducing the risk of breakage and extending the frame's lifespan. This means the Hunter 2.0 can withstand tough impacts and rough conditions, providing a safer and more reliable ride.
While the frame's strength and stability have been significantly improved, this upgrade has led to a slight increase in the overall weight of the bike. However, this is a result of the many enhanced components we've added. With a more powerful motor, upgraded braking system, and reinforced rear rack, the Hunter 2.0 needs a sturdier frame to support the increased performance and weight capacity. These upgrades not only boost the bike’s performance but also ensure it can handle more demanding rides and support heavier loads, making it perfect for riders who push their limits.
5. Saddle Upgrade: More Comfort for Longer Rides
Long rides require a comfortable saddle, and the Hunter 2.0 delivers just that. The saddle has been redesigned with ergonomic support and breathable ventilation holes to keep you cool and comfortable, even on long trips. The improved design ensures a better riding posture and reduces fatigue, allowing you to stay comfortable and focused on the road ahead.
6. Rear Rack Upgrade: Increased Strength for Heavy Loads
The rear rack has also received a significant upgrade. It’s been reinforced to provide a stronger, more stable support for heavier loads, making it perfect for carrying gear or commuting with additional items. Whether you’re heading out on a weekend adventure or need to carry groceries, the upgraded rear rack ensures your cargo is securely supported without compromising the bike’s stability.
Conclusion: A Complete Upgrade for a New Riding Experience
The Hunter 2.0 has undergone a complete transformation, making it one of the most powerful and versatile electric bikes on the market today. With its upgraded motor, front fork, braking system, frame, saddle, and rear rack, the Hunter 2.0 is built to deliver superior performance, comfort, and durability in any environment. Whether you’re commuting through the city or exploring rugged trails, this bike is ready for any challenge.
So, what are you waiting for? Don’t just take our word for it—experience the Hunter 2.0 for yourself and see how these upgrades can transform your riding experience!
Read more

Maintenance
Lost or Broken Kingbull Battery Key? Here’s How to Fix It Fast
Hey, Kingbull bike riders! We know the feeling—you’re ready for a scenic ride, but you realize your ebike battery key is lost or has snapped off in the lock. It’s a common headache, but it doesn't have to end your journey.
At Kingbull, we’re committed to your riding experience. Whether you need an ebike battery key replacement or a complete lock swap, we’ve got you covered with this step-by-step guide.
Proactive Prevention: Secure Your Spare Key
The best way to handle a lost electric bike key is to never have a "last" key.
The Golden Rule: As soon as you unbox your new Kingbull e-bike, separate the two keys provided.
Store Safely: Keep your spare in a secure, memorable location at home—never on your keychain while riding!
Photo Record: Take a clear photo of your key code (if applicable) for future reference.
Option 1: Purchase a Brand New Battery Lock and Key (Official Solution)
If you’ve lost both keys or your lock mechanism is damaged, the most secure and reliable method is a full ebike battery lock replacement.
Why choose the official Kingbull lock set?
Guaranteed Compatibility: No guesswork on fitment for your specific model.
Enhanced Security: A fresh set ensures your battery remains theft-resistant.
Everything Included: Comes with a new lock cylinder and two matching keys.
[Shop Official Kingbull Battery Lock Sets Here] (Internal Link to Store)
Step-by-Step: How to Replace Your E-bike Battery Lock
Replacing the lock is easier than you think. Follow these four steps to get back on the road:
Step 1: Remove the Battery
Safely remove the battery from the bike frame. (Note: If your lock is jammed, please contact our [Technical Support] for specialized unlocking tips).
Step 2: Remove Screws on the Battery Upper Base
Locate the upper base where the battery connects. Use a precision screwdriver to unscrew the fasteners (refer to the red circled areas in the diagrams below).
Step 3: Detach and Swap the Lock Base
Unscrew the side bolts that secure the battery lock to the bike frame. Once loose, pull the entire battery base out.
Detach the old lock mechanism.
Snap the new Kingbull lock into the base, ensuring it aligns perfectly.
Slide the assembled unit back into the frame.
Step 4: Secure Everything
Tighten the screws on both the upper base and the side of the bike. Double-check that the lock moves smoothly with your new key before inserting the battery.
Option 2: Get a Spare Key Made Locally (The Quick Fix)
If you still have one working key, don't wait for it to break!
Where to go: Visit a local hardware store or a professional locksmith.
Cost-Effective: This is the fastest way to get a backup without replacing any hardware.
Tip: Ask the locksmith to use a high-quality "blank" to ensure the new key doesn't snap under pressure.
Frequently Asked Questions (FAQ)
Q: Can I order a new key using my bike’s serial number?
A: To ensure maximum security, Kingbull locks are unique. If both keys are lost, we recommend a full lock replacement (Option 1) to ensure your battery remains secure.
Q: What tools do I need for the replacement?
A: Most Kingbull models require a standard Phillips head screwdriver and potentially an Allen (hex) wrench.
Q: My key is stuck in the lock, what should I do?
A: Use a small amount of lubricant (like WD-40 Specialist Silicone) to wiggle it free. Do not apply excessive force, as this may damage the internal pins.
Ride Worry-Free with Kingbull
Losing a key is a bump in the road, not the end of the trip. By keeping a spare safe or knowing how to perform a quick battery lock replacement, you’ll stay prepared for any adventure.
Need further help? Contact the Kingbull Support Team or browse our [Maintenance Video Library].
Stay Prepared. Ride with Confidence. Enjoy the Journey!
Read more


